Writing a simple AI-powered chrome extension for LinkedIn
A tutorial on building a custom Chrome Extension for LinkedIn post commenting. Extract data from LinkedIn, generate comments using AI, and learn the essentials of Chrome extension dev.
Introduction
A wonderful method to improve the user experience and add unique features to the browser is to build a Chrome Extension. It might add a special feature. The increased development of AI technologies opens up a number of beneficial productivity extensions.
In this tutorial, we'll access the LinkedIn page and extract the post text using JavaScript and basic web scraping. We'll also use GPT-3 to generate comments on LinkedIn. We'll go over the key elements of Chrome extensions and build a simple one. The backend part and prompt engineering are not covered in this tutorial; instead, they will be covered separately. Here, we will only use a ready-to-use endpoint as a black box.
If you want to check the final extension work, you can check the video:
Things to know before start coding
Before we start coding, there are several important parts of chrome extensions concept that we need to discover and understand. If you know that you can feel free to skip that section.
Structure of chrome extension

Chrome extensions has a common structure that contains essential parts of the app:
manifest.json- The manifest of the extension is the only required file with a specific file name: manifest.json. It must also be in the extension's root directory. The manifest contains important metadata, defines resources, declares permissions, and specifies which files should run in the background and on the page.content.js- Content scripts are files that run in the context of web pages. By using the standard Document Object Model (DOM), they are able to read details of the web pages the browser visits, make changes to them, and pass information to their parent extension. More in docs. In our case we will put the content-related logic, such as parsing the LinkedIn page, adding custom buttons to the comment section and extracting post text.background.js- background service worker. It is used to run tasks continuously, even when the extension's popup or options pages are not open. In our case, this file will handle the background processes of the extension, such as making API calls to the backend endpoint and processing the response. As we want to make API request to out custom endpoint, we need to do that separately from service worker, to prevent cross origin requests.
There is also a popup part, that defines the logic of Chrome extension popup, that we will skip, as in our tutorial we don't need any popup UI and logic for the app.
We add file styles.css to the structure to make it not so boring and improve UI part. This file provides the CSS styles for the extension's additional elements on the LinkedIn page. It will be used to style the custom buttons added to the comment section.
More details about the structure of the of chrome extension could be found in the official docs.
Manifest.json overview
The manifest.json file is a configuration file for a chrome extension that contains important information about the extension such as its name, version, and permissions required. In version 3 of the manifest file, there are several new features and changes to the format, including support for extension modules and service worker scripts, as well as increased security measures.
One of the most important sections in the manifest.json file is the permissions section, where the extension specifies what permissions it needs in order to function properly. For example, an extension that needs to access a user's browsing history would need the "history" permission. In our case we only need tabs permission to send events between service worker and content page. All permissions can be checked in the official docs.
Another important part to make API calls is host_permissions. It contains one or more match patterns that give access to specified hosts. In our case we host our backend endpoint on AWS and need to specify that as https://*.amazonaws.com/* to make it possible to interact with the API. Note: Better to provide a particular pattern with minimum usage of *, like https://12345.amazonaws.com/* as we minimise the potential surface of security issues. For the tutorial purpose we simplify this part.
We need also specify content script and styles file paths, that we are going to use to inject custom logic and styles into the page in content_scripts section.
Finally, we have next manifest.json file:
{
  "manifest_version": 3,
  "name": "LinkBuddy",
  "version": "0.0.1",
  "permissions": [
    "tabs"
  ],
  "host_permissions": [
    "https://*.amazonaws.com/*"
  ],
  "content_scripts": [
    {
      "matches": ["https://www.linkedin.com/*"],
      "css": ["styles.css"],
      "js": ["content.js"]
    }
  ],
  "action": {
    "default_title": "LinkBuddy"
  },
  "background": {
    "service_worker": "background.js"
  }
}
Event messaging in chrome extension
One more concept to understand before start is message passing or event messaging.
Event messaging is a key concept in building a Chrome extension. It allows different parts of the extension, such as the content script and the background script, to communicate and exchange data.
In a simple example, let's say we have a button on a website that a user can click. The button is in the content script and when it is clicked, it sends a message to the background script to perform a specific action.
When the button is clicked, the content script uses the chrome.runtime.sendMessage() function to send a message to the background script. The message can be in the form of an object that contains any data that needs to be passed.
document.getElementById("button").addEventListener("click", function() {
    // we send message of particular type "button-clicked"
    chrome.runtime.sendMessage({
        type: "button-clicked"
    });
});
In the background script, we listen for the message using the chrome.runtime.onMessage.addListener function. When the message is received, we can perform the desired action based on the data in the message.
chrome.runtime.onMessage.addListener(
    // we listen to all messages and process them
    function(request, sender, sendResponse) {
        if (request.type === "button-clicked") {
            // Perform desired action
        }
    }
);
This is just a simple example, but event messaging can be used in a variety of ways in a Chrome extension. It can be used to send data between different parts of the extension, trigger actions, or even send data to a server. The key is to use a consistent naming convention for the message and its data, so that the different parts of the extension can understand it.
Writing the content logic
Once we have the structure of the extension set up, understand messaging system in the extension and wrote manifest json we are good to start.

Data flow overview
The data flow of the extension is described below. Below is a description of the extension's data flow. Knowing what parts pass what data and how they interact with one another is crucial when designing an application.
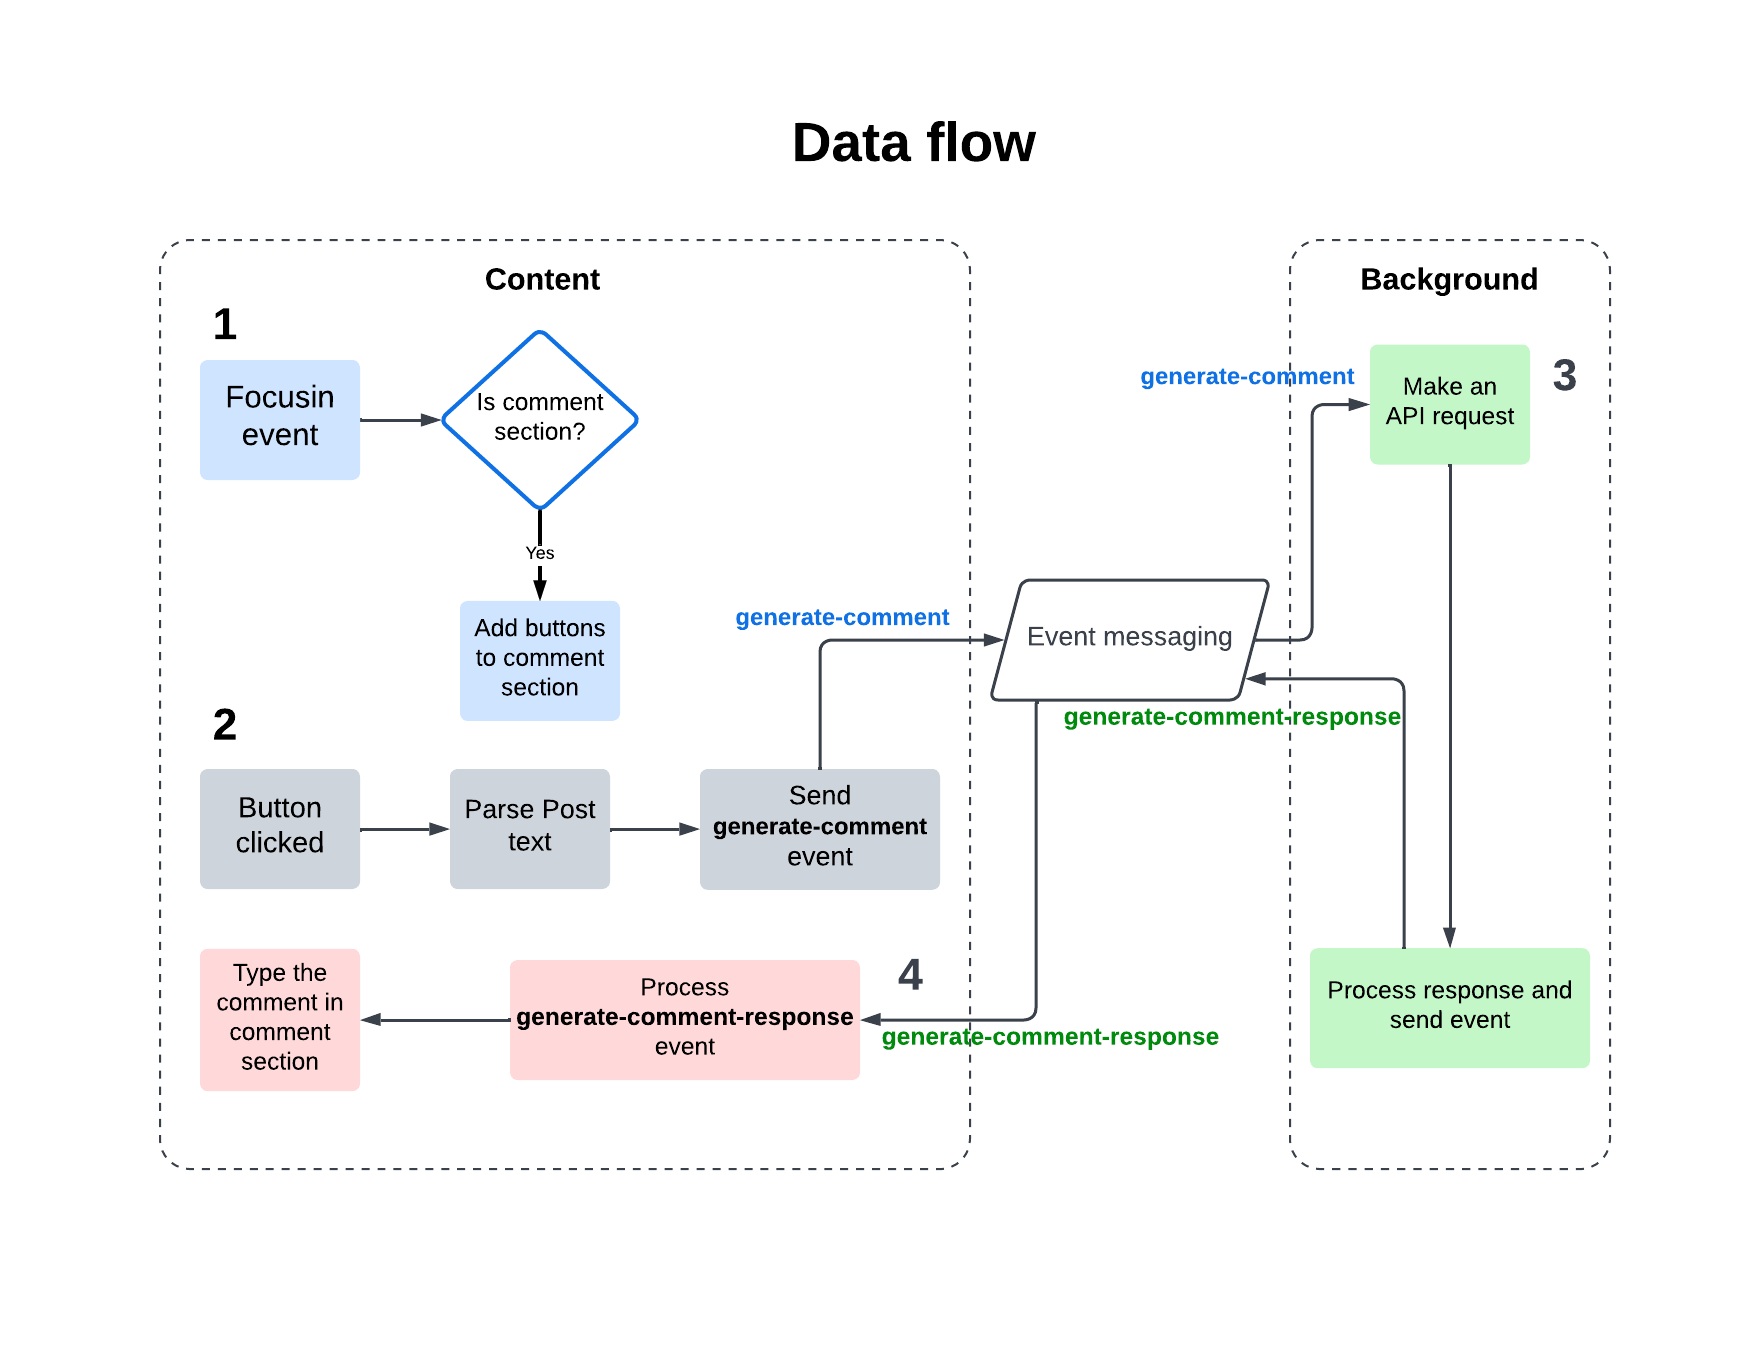
- Listen to
focusinevent on the page. If it is a comment section add 3 buttons with event onClick event handlers. - When the button is clicked collect text data from post, generate request body and send it as
generate-commentevent to background worker using message passing. - On background worker listen to the
generate-commentevent and make an API call with the provided body. Send a response asgenerate-comment-responseevent to content. - On
generate-comment-responseevent trigger type the text of comment in the comment section.
LinkedIn page analysis
To extract post text and identify comment section to insert custom button and comment we need to discover them on page and scrape them after that. To do the we need to use elements tab from Chrome dev tools.
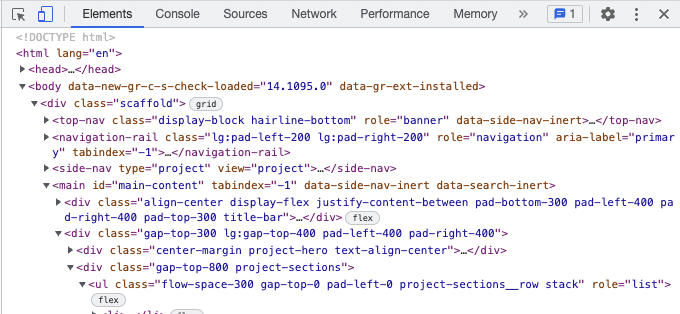
In the inspect section of chrome we can discover that all the feed page split into same blocks and comment sections are implemented as custom div with class ql-editor.
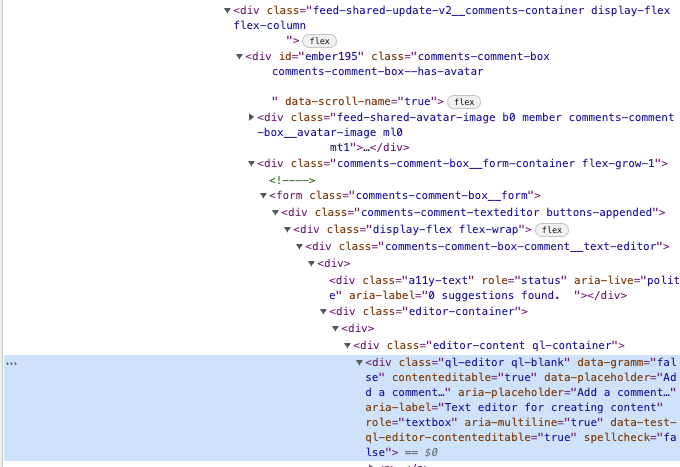
To extract for the particular comment the relevant post section we can find the parent container of the whole post, that is a div with class feed-shared-update-v2 and extract text from div with class feed-shared-update-v2__description-wrapper.
Content.js script
Now we can write some code of the extension.

Listen to focusin event
In order to make our chrome application interactive, we need to implement logic for extracting elements from the page and responding to user actions. One way to do this is by using event listeners.
We need to use the focusin event listener to detect when a user has clicked on a specific element on the page. We can then extract that element and perform some action, such as displaying information about the element or modifying its properties.
Note: It's important to note that, in order to use event listeners in a chrome extension, we need tabs permission in manifest.json.
In content.js we need to add the code:
document.addEventListener("focusin", function(event) {
    // the focused element is `event.target`
});
Add buttons
As we discovered during LinkedIn page analysis, to identify that the focusin target is a comment section, it should be a div with class ql-editor. So we need to add to content.js:
if (event.target.classList.contains("ql-editor")) {
    // process the div as a comment field
}
After that we can add 3 buttons. In the code example below we add only one button, but other are added in the same way. The processing code looks like:
if (event.target.classList.contains("ql-editor")) {
    const parentForm = event.target.closest(".comments-comment-texteditor");

    if (parentForm && !parentForm.classList.contains("buttons-appended")) {
        // add appended class to add buttons only on the first event trigger
        parentForm.classList.add("buttons-appended");

        // create and append engage button
        let engageBtn = document.createElement("button");
        engageBtn.classList.add("rounded-button");
        engageBtn.innerText = "🤝 Engage";

        parentForm.appendChild(engageBtn);

        engageBtn.addEventListener("click", function(event) {
            processButtonClicked(event, "engage", parentForm);
        })
    } else {
        console.log("No parent with the class 'comments-comment-texteditor' found for the focused element.");
    }
}
We get out buttons:

Let's add some beauty to that with styles.
Add styles to the page
To add custom styling we need to append an additional stylesheet link to the head section of the page. We need to add to content.js:
let link = document.createElement("link");
link.setAttribute("rel", "stylesheet");
link.setAttribute("href", chrome.runtime.getURL("styles.css"));
document.head.appendChild(link);
As styles we have button style and simple pulse animation in styles.css:
.rounded-button {
    border-width: 1px;
    /*border-color: #000000;*/
    border-color: rgba(0,0,0,0.3);
    border-style: solid;
    margin: 10px 3px 10px 3px;
    padding: 5px 10px 5px 10px;
    border-radius: 20px;
}

.first-rounded-button {
    margin-left: 10px;
}

.loading-animation {
    box-shadow: 0 0 0 0 rgb(247, 77, 77);
    transform: scale(1);
    animation: pulse_animation 2s infinite;
}

@keyframes pulse_animation {
    0% {
        transform: scale(0.95);
        box-shadow: 0 0 0 0 rgb(247, 77, 77);
    }

    70% {
        transform: scale(1);
        box-shadow: 0 0 0 10px rgba(0, 0, 0, 0);
    }

    100% {
        transform: scale(0.95);
        box-shadow: 0 0 0 0 rgba(0, 0, 0, 0);
    }
}

.disabled {
    opacity: 0.8;
    pointer-events: none;
}
As the result we will have such buttons:

Button click processing
Button click processing handles by processButtonClicked function.
To avoid simultaneous requests we need to check if there is already clicked button handler running. If there is, we simply return and do nothing to prevent multiple comments from being generated simultaneously. Also, we disable all other buttons on the page to ensure that only one action can be performed at a time.
// global in content.js
let loading = false
// function processButtonClicked
if (loading) {
console.log('already loading');
return;
}
document.querySelectorAll(".rounded-button").forEach(function(button) {
button.setAttribute("disabled", true);
button.classList.add("disabled");
});Not to be boring, we add a pulse animation to the clicked button to provide visual feedback to the user that the extension is working.
event.currentTarget.classList.add("loading-animation");We then extract the full text of the parent post and remove any "see more" text that may be present. This text will be used in the generation of the comment.
// extract full text of the parent post
const parent = event.currentTarget.closest(".feed-shared-update-v2");
const elements = parent.getElementsByClassName("feed-shared-update-v2__description-wrapper")
let text = elements[0].innerText;
const textWithoutSeeMore = text.replace(/…see more/g, "");
Finally, we save the current state of the app and send a message to the background script, passing the button type and the text of the parent post.
// save current state of the app
loading = true
processButton = event.currentTarget
processParent = parentForm

// send the event
chrome.runtime.sendMessage({
    type: "generate-comment",
    buttonType: buttonType,
    event: event,
    parentForm: parentForm,
    text: textWithoutSeeMore,
});
The final code of the function is:
function processButtonClicked(event, buttonType, parentForm) {
    // check if we already loading the response
    if (loading) {
        console.log('already loading');

        return;
    }

    // disable all other buttons to avoid multiple comments creation simultaneously
    document.querySelectorAll(".rounded-button").forEach(function(button) {
        if (button.id !== "expertBtn") {
            button.setAttribute("disabled", true);
            button.classList.add("disabled");
        }
    });

    // add pulse animation to the clicked button
    event.currentTarget.classList.add("loading-animation");

    // extract full text of the parent post
    const parent = event.currentTarget.closest(".feed-shared-update-v2");
    const elements = parent.getElementsByClassName("feed-shared-update-v2__description-wrapper")
    let text = elements[0].innerText;
    const textWithoutSeeMore = text.replace(/…see more/g, "");

    // save current state of the app
    loading = true
    processButton = event.currentTarget
    processParent = parentForm

    // send the event
    chrome.runtime.sendMessage({
        type: "generate-comment",
        buttonType: buttonType,
        event: event,
        parentForm: parentForm,
        text: textWithoutSeeMore,
    });
}
Background.js script
In the background.js we write a simple background worker logic.
When the event listener receives "generate-comment" message, it calls the processGenerateCommentRequest function with the message's data.
chrome.runtime.onMessage.addListener(async (request, sender, sendResponse) => {
    switch (request.type) {
        // listen to the event
        case "generate-comment":
            await processGenerateCommentRequest(request);

            break;
        default:
            console.log('unknown request type', request.type);
    }
});
This function makes a POST request to an API endpoint with text of the post and button type, process the response and sends the result back to the extension's front-end.
async function processGenerateCommentRequest(request) {
    const config = {
        text: request.text,
        commentType: request.buttonType,
    }

    const requestOptions = {
        method: 'POST',
        headers: {
            'Content-Type': 'application/json',
        },
        body: JSON.stringify(config)
    };

    let response = {
        type: "generate-comment-response",
        error: "something went wrong",
    };
    try {
        // send API request
        let res = await fetch(`${apiBaseURL}/comment`, requestOptions);

        // process the results
        const results = await res.json()
        response = {
            type: "generate-comment-response",
            parentForm: request.parentForm,
            comment: results.results.comment,
        }
    } catch (error) {
        response = {
            type: "generate-comment-response",
            error: error,
        };
    }

    // send the event with response
    chrome.tabs.query({
        active: true,
        currentWindow: true
    }, function(tabs) {
        chrome.tabs.sendMessage(tabs[0].id, response, function(response) {
            console.log('send response', response)
        });
    });
}
Receive comment in content.js and display it
The final step of building our chrome extension is receiving the event in the content.js script and displaying the comment.
To do this, we use the chrome.runtime.onMessage.addListener function to listen for messages sent from other scripts. In this case, we are listening for messages with the type generate-comment-response, which we sent from the background.js script.
chrome.runtime.onMessage.addListener(function(request, sender, sendResponse) {
    switch (request.type) {
        case "generate-comment-response":
            // stop loading process and enable all buttons
            loading = false;
            processButton.classList.remove("loading-animation");

            document.querySelectorAll(".rounded-button").forEach(function(button) {
                button.removeAttribute("disabled");
                button.classList.remove("disabled");
            });

            if (request.error) {
                console.error(request.error);

                return
            }

            emulateWriting(processParent, request.comment);

            break;
        default:
            console.log('unknown request type', request.type);
    }
});
After that we process the message and if it is successful type it into the comment section using emulateWriting function.
function emulateWriting(parentElement, text) {
    let input = parentElement.querySelector(".ql-editor.ql-blank p");
    let i = 0;
    let interval = setInterval(() => {
        if (i < text.length) {
            input.innerText += text[i];
            i++;
            for (let j = 0; j < 10; j++) {
                if (i < text.length) {
                    input.innerText += text[i];
                    i++;
                }
            }
        } else {
            clearInterval(interval);
            // we need to remove `ql-blank` style from the section by LinkedIn div processing logic
            input.parentElement.classList.remove("ql-blank");
        }
    }, 10);
}
Conclusion
We have explained the basic concepts of the chrome extension and covered the steps to build a simple one that generates comments using the power of GPT-3.
Using a similar approach we can make personalized processing of different social media, summaries of articles, generation of other types of messages,s and whatever you can think about. Of course, the quality of the response could be good enough, but it is mostly for drafts of some comments and still need to be checked by the human first. But the results for such a simple project look great.
Thank you for reading this tutorial, and if you have any questions or feedback, please don't hesitate to reach out. Subscribe to not miss more similar tutorial articles 💡.
Happy coding! 💻